October Stamp Club

in , by Kari Downing Reese, October 26, 2013
October is underway and now it's time for Thanksgiving and Christmas cards! 
This Thanksgiving card would make a great addition if you are bringing a side dish to someone's home for the Thanksgiving meal or to send to a friend/family member who is not close by!
 
*Magnificent Maple and Tags 4 You stamp sets
  *Decorative Label and Label Bracket punches
 *Summer Starfruit ink and cardstock
 *Sweater Weather Designer Series Paper
 *Soft Sky Seam Binding Ribbon


The next card is SUPER SIMPLE to put together and uses some BLING!!  The colors could be switched out for some Old Olive and Cherry Cobbler if you wanted to go with the red/green theme
 
 *O Holy Night stamp set
*Scallop border punch
*Midnight Muse ink and cardstock
 *Smoky Slate and Soft Sky cardstock
*Silver Glimmer Paper
*Winter Frost DSP stack
*Silver 1/8" Ribbon  


The last project we made in October Stamp Club is my FAVORITE!! 
I saw this idea on a card at 2013 Stampin' Up! Convention!
I love how versatile Stampin' Up! stamps, punches, etc are.  See how I used the Mosaic Madness punch to create a Christmas themed card.
 
*Post Card stamp set
*Mosaic and Itty Bitty Shapes punches
*Petals-a-Plenty Embossing Folder 
*Soft Suede ink
*Cherry Cobbler and Old Olive cardstock
*Silver Glimmer Paper
*Crumb Cake 3/8" Taffeta Ribbon 
Run the Cherry Cobbler cardstock thru the Big Shot with the Petals-a-Plenty Embossing Folder then punch out the shape with the Mosaic punch.  Use the Mosaic punch to punch out the Old Olive.
Sponge around all the edges using Soft Suede ink  
Here is a close up of the Poinsettia flower made using the punches.  The Old Olive pieces are the leaves and the Cherry Cobbler pieces are the flower (arrange with pointed ends touching and alternate the shape for the top layer).  Add the center piece of Silver Glimmer Paper punched with the Itty Bitty Shapes!


Voila!
 
I hope you enjoyed these projects and find some stamping inspiration to start making those Christmas cards!  How many cards are you sending out this holiday season?

To order supplies used to make these projects, shop online 24/7 at http://kari.stampinup.net

Happy Stamping!

Kari


Join Stampin' Up! for only $25

by Kari Downing Reese, October 20, 2013
Wow!!  To celebrate Stampin' Up!'s 25th Anniversary this year, anyone can join the Stampin' Up! family for only $25!  Yep, $25! 

When you join for only $25, you will have access to the demo website, purchasing product with a discount, and/or perusing the hundreds of samples, videos, tips and techniques on the website from now until March 2014; no risk, no commitment, just plain and simple fun!

Why you will LOVE being a part of the Stampin' Up! family:
*You'll see all the new products a month before anyone else AND preorder it before it goes live
*You will receive a 20% discount on any of your orders!  Never pay full price!
*Our awesome Stampin' Success magazine sent to your home every second month
*Invite to Stampin' Connection-an online community of message boards and sample pictures
*Full access to all of Stampin' Up!'s product and technique training
*Don't forget-you can earn FREE stamps and products as well as extra money-if you choose to!
*Be a member of Kari's Krafters-a community of stampers and demos who share ideas, inspiration and a few laughs!

Don't delay, try it today!  What better way to build relationships, meet new friends, craft and inspire others!

Join Now!

Happy Stamping!
Kari Downing
kdowning9678@yahoo.com

September Stamp Club

in , , by Kari Downing Reese, October 20, 2013
September Stamp Club celebrated Halloween and Thanksgiving early!  See the three projects we made below!
 
The first card uses the Harvest of Thanks stamp set from the 2013 Holiday Catalog and some dies from the Apothecary Accents Framelits. 
 The fun part of this card is the fold.  I took an 8.5x11 sheet of Summer Starfruit cardstock, cut it in half, then scored at 3.5 and 2


 Cut the die shape out of Chocolate Chip cardstock
 Stamp the image with Summer Starfruit ink onto the top half of the cardstock
 Using the same image, use the Chocolate Chip, Cherry Cobbler, and Summer Starfruit markers to color the stamp image, then stamp on Very Vanilla cardstock
 Cut the image out using the Framelit and the NEW MAGNETIC PLATFORM! 
This platform is a breeze to use, especially when you are cutting out stamped images!
 Voila!  The card assembled using some Sweater Weather Designer Series Paper and some Soft Sky seam binding ribbon.

 The second project uses the Tags 4 You stamp set and the matching Label Bracket Punch.  This stamp set and punch can be purchased together as a bundle at a 15% savings!
 The 3x3 size is perfect for a small card or tag to add to a gift or could be used as fun place settings

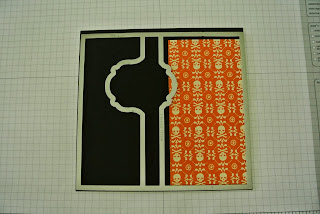
 The third project is using the Thinlit Card Dies; this one is the Label Card Die.  With just a flip, look at how cute this card is!  BONUS:: Look at the extra accessories that comes in the pack.  This set has endless possibilities! I also used the Halloween Bash stamp set; I love this Halloween set.


I hope you are inspired to create some spooky treats and some thanksgiving cards this season!
 
Happy Stamping
 
Kari
Shop 24/7 for any of these products used on these projects at
 

© Kari's Krafts · THEME BY WATDESIGNEXPRESS